Introduction and Quick Summary
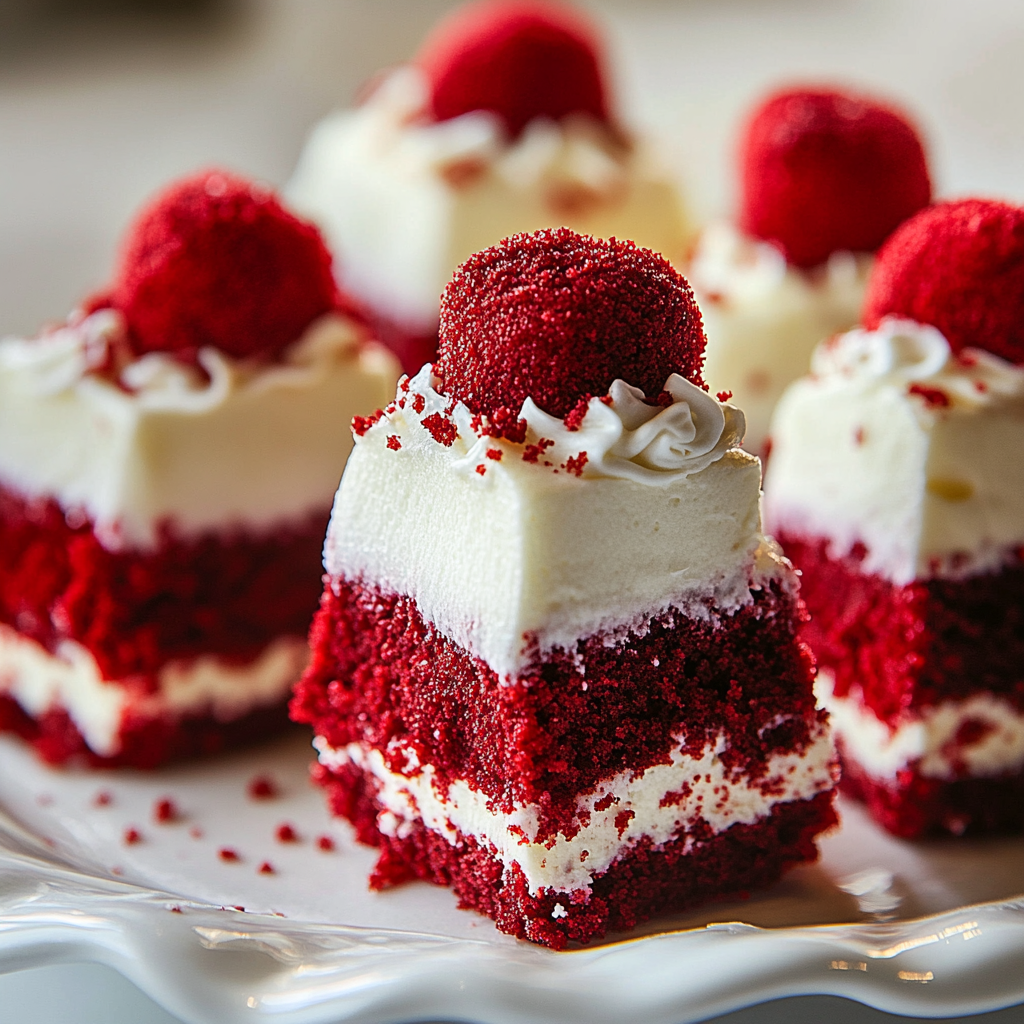
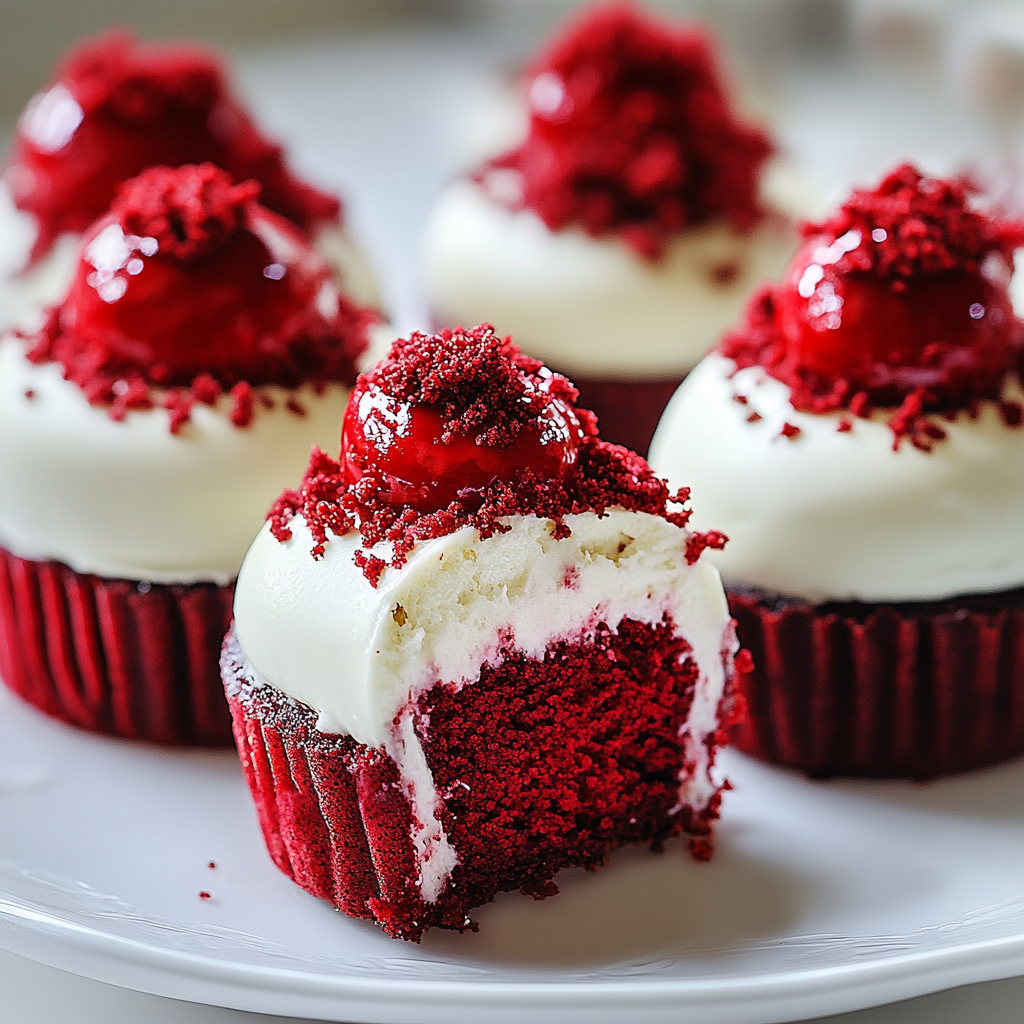
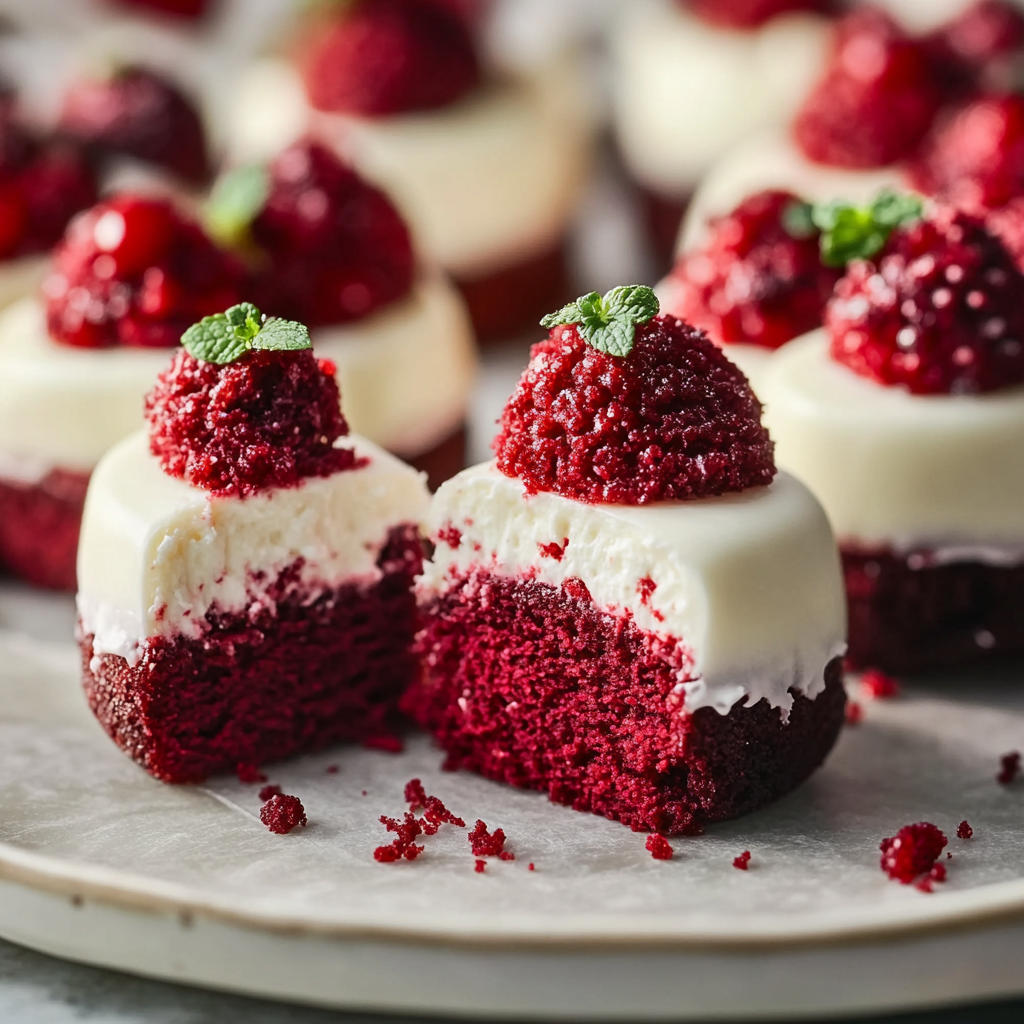
Are you ready to indulge in a decadent dessert that combines the richness of red velvet cake with the creamy delight of cheesecake? Look no further than these delightful Red Velvet Cheesecake Bites. Perfect for parties, holiday gatherings, or just a sweet treat at home, these bite-sized delights offer an irresistible blend of flavors that will leave everyone asking for more.

These little gems are not only visually stunning with their vibrant color but also easy to make. The smooth cream cheese filling contrasts beautifully with the tender crumb of the red velvet cake. Plus, they’re portable and perfect for sharing! Whether you want to impress guests at a dinner party or simply enjoy a sweet snack while binge-watching your favorite show, these Red Velvet Cheesecake Bites fit the bill perfectly.
In this article, we’ll walk you through the essential ingredients required to create these bites and provide step-by-step instructions on how to prepare them. We’ll also cover serving suggestions and storage tips so you can enjoy them fresh or keep them handy for later. Let’s dive into making your new favorite dessert!
Main Ingredients
1. All-Purpose Flour
All-purpose flour serves as the foundation for our Red Velvet Cheesecake Bites. You’ll need about 1 ½ cups to achieve the perfect texture. This versatile ingredient provides structure to the cake while ensuring it remains soft and tender. When measuring flour, spoon it into your measuring cup and level it off with a knife for accuracy.
2. Cocoa Powder
Cocoa powder adds depth of flavor and that signature reddish-brown hue associated with red velvet desserts. Just 2 tablespoons is enough to enhance the taste without overpowering it. Make sure to use unsweetened cocoa powder for balanced sweetness in your bites.
3. Sugar
Granulated sugar is essential for sweetness; you’ll need 1 cup for the batter. Sugar not only sweetens but also helps retain moisture in your bites, ensuring they stay soft and delicious after baking.
4. Baking Soda
Baking soda is crucial for leavening; it helps your bites rise beautifully as they bake. You only need 1 teaspoon mixed into your dry ingredients to achieve that light texture we all crave in desserts.
5. Salt
A pinch of salt (about ½ teaspoon) enhances all the other flavors in your Red Velvet Cheesecake Bites without making them taste salty. It balances sweetness and brings out the rich cocoa notes.
6. Vegetable Oil
Using vegetable oil (⅓ cup) instead of butter keeps these bites moist and tender while adding a subtle richness that complements the cream cheese filling perfectly.
7. Buttermilk
Buttermilk (½ cup) adds tanginess that elevates the flavor profile of these bites while also contributing to their softness due to its acidity reacting with baking soda – resulting in fluffy treats.
8. Eggs
You will need one large egg (at room temperature) to bind everything together and add moisture to your batter while providing richness essential in any dessert recipe.
9. Vanilla Extract
Adding just one teaspoon of vanilla extract enhances both aroma and flavor – giving those little bites an irresistible scent as they bake in your oven!
10. Cream Cheese
The star ingredient for our filling! You’ll need an 8-ounce package of softened cream cheese mixed with powdered sugar to create that deliciously creamy center we all love about cheesecake.
How to Prepare RED VELVET CHEESECAKE BITES
Step 1: Preheat Your Oven & Prepare Baking Pan
Start by preheating your oven to 350°F (175°C). While it heats up, take a moment to prepare your baking pan—line an 8×8-inch square pan with parchment paper or lightly grease it using baking spray or butter. This preparation ensures easy removal of your bites once baked and minimizes cleanup afterward.
Next, gather all dry ingredients including flour, cocoa powder, baking soda, and salt in a medium bowl; whisk them together until evenly blended—this step prevents clumping during mixing later on! Set aside as you combine wet ingredients next.
Step 2: Mix Wet Ingredients
In another mixing bowl, combine vegetable oil, granulated sugar, buttermilk, egg (beaten), and vanilla extract together using an electric mixer or whisk until smooth—aiming for combined consistency without lumps! This mixture should appear slightly thick but pourable before moving onto integrating dry contents fully.
Once combined well enough from Step One’s concoction; slowly add this dry mix into wet ingredients while blending continuously on low speed—scraping sides occasionally ensures even distribution throughout batter! Continue beating until just incorporated—do not overmix because this could lead dense results rather than light fluffy ones desired!
Step 3: Bake Your Cake Base
Pour prepared batter into lined pan; spread evenly across surface using spatula or back side spoon if needed! Bake at preheated temperature for about twenty-five minutes or until a toothpick inserted comes out clean—this indicates cakes’ readiness! Once done remove from oven carefully placing onto cooling rack allow cooling completely before proceeding toward next steps regarding filling creation mentioned below!
Step 4: Prepare Cream Cheese Filling
To create delicious filling mix softened cream cheese along with powdered sugar using hand mixer until creamy texture achieved—about two minutes should suffice! Ensure no lumps remain within mixture which could disrupt overall flavor experience later down line when biting into finished product! Place filling inside refrigerator briefly while waiting on cake base cools down completely; this allows easier spreading process ahead!
Step 5: Assemble Your Bites
Once cooled adequately slice cake horizontally across middle producing two even layers—you want maintain uniformity here ensuring ample space exists between layers allowing adequate filling insertion without overflow risk occurring afterward during enjoyment phase later on! Spread prepared cream cheese mixture generously across one layer then gently place second layer atop ensuring alignment maintained throughout assembly process here carefully avoiding excessive pressure causing unnecessary displacement during transition phases ahead!
After assembling layers successfully chill assembled creation within refrigerator roughly thirty minutes allowing components meld properly enhancing overall texture/flavor development immensely once served afterward—patience rewarded indeed!
Serving and Storing Tips
Serving Suggestions
When ready serve those delectable little Red Velvet Cheesecake Bites cut them into squares approximately two inches per piece—it allows guests grab easily plus gives enough portion control if trying limit indulgence levels too much! Consider garnishing each square lightly dusted confectioners’ sugar atop right before presenting guests enticing visual appeal alongside potential enjoyable tastes merging together harmoniously!
Pairing options include fresh berries such as strawberries raspberries topped whipped cream drizzled chocolate sauce enhancing aesthetics even further enticing diners visually appealing sight before tasting begins truly elevating experience altogether creating memorable moments undoubtedly shared around table atmosphere itself joyous occasion worthy celebration indeed even beyond initial gathering intentions envisioned earlier!
Don’t forget best enjoyed chilled—store leftovers within airtight container keeping refrigerated maintains freshness longer extending lifespan beyond typical four days traditionally found many desserts allow savoring moments longer than anticipated originally thought possible leading delightful surprises emerge during future cravings arise unexpectedly!
Storage Recommendations
If you find yourself with leftovers—or simply wish prepare ahead time—you can store any remaining unconsumed portions within fridge arranged properly covered securely utilizing plastic wrap foil ensuring minimal exposure air preventing drying out occurring prematurely ideally maintaining optimal quality extended duration likely several days maximum observed here depending upon environmental factors present occurring naturally over time!
Alternatively freeze uncut whole batch wrapped tightly foil placed freezer-friendly containers allowing preservation up three months grants flexibility accommodating spontaneous dessert desires arising down road whenever mood strikes permitting indulgence regardless situation arising spontaneously prompting delightful treats consumed immediately thereafter leading joy-filled moments fostered through culinary creations shared friends family alike truly connecting people beyond mere sustenance itself fostering bonds stronger formed through shared experiences enjoyed thoroughly together whether large gatherings intimate dinners alike promising satisfaction guaranteed every time indulged upon absolutely unforgettable memories made forever cherished thereafter!
Mistakes to avoid
Understanding common mistakes can elevate your baking game, especially when creating delicious Red Velvet Cheesecake Bites. Here are some critical errors to steer clear of.
Incorrect Measurements
When baking, precise measurements are crucial. Many novice bakers overlook this aspect, thinking that approximations will suffice. For Red Velvet Cheesecake Bites, using the right amount of flour, sugar, and cocoa powder is essential for achieving the desired texture and flavor. Incorrect measurements can lead to dry or overly moist bites that fall apart or lack flavor. Always use measuring cups and spoons designed for dry ingredients and liquids separately. Weighing ingredients using a kitchen scale can enhance accuracy. If you find yourself without a scale, ensure you level off dry ingredients with a straight edge for consistency.
Neglecting Room Temperature Ingredients
Another common mistake is not allowing dairy products like cream cheese and eggs to reach room temperature before mixing. Cold ingredients do not blend well, resulting in lumps in your batter. For smooth and creamy Red Velvet Cheesecake Bites, it’s vital to take cream cheese and eggs out of the refrigerator at least 30 minutes before you start baking. This practice helps create a smoother batter, leading to an even bake.
Overmixing the Batter
While it may be tempting to mix your batter until perfectly smooth, overmixing can introduce too much air into your mixture. This can cause your bites to rise too quickly and then collapse as they cool down. Aim for just enough mixing to combine the ingredients without overdoing it. A gentle folding technique can help maintain a tender crumb structure for your cheesecake bites.
Skipping the Chill Time
Many bakers may underestimate the importance of chilling time for cheesecake mixtures. Skipping this step can lead to soft bites that lack structure and stability when served. After preparing your cheesecake filling, refrigerate it for at least an hour before scooping it into bite-sized forms. Chilling helps firm up the mixture, making it easier to work with and ensuring perfect bites every time.
Tips and tricks
To master Red Velvet Cheesecake Bites, consider these expert tips that will enhance both flavor and presentation.
Choosing Quality Ingredients
The quality of your ingredients directly impacts the final taste of your Red Velvet Cheesecake Bites. Use high-quality cocoa powder for that rich chocolate flavor; look for Dutch-processed cocoa if you prefer a deeper color and smoother taste. Similarly, opt for full-fat cream cheese rather than low-fat options; this choice ensures a creamy filling with optimal flavor richness. Even small tweaks, like using real vanilla extract instead of imitation vanilla, can elevate your cheesecake bites significantly.
Adding a Touch of Acid
To balance the sweetness in Red Velvet Cheesecake Bites, consider adding a touch of acid to your recipe. A small amount of lemon juice or vinegar enhances flavors without overpowering them. The acid reacts with the baking soda in the recipe, helping achieve the perfect rise while providing depth of flavor that complements the creaminess of the cheesecake filling beautifully.
Experimenting with Toppings
Presentation matters when serving Red Velvet Cheesecake Bites! Consider experimenting with toppings to take them from simple to stunning. Drizzle melted white chocolate or sprinkle crushed nuts on top for added texture and visual appeal. Fresh berries such as raspberries or strawberries also make excellent accompaniments, providing a pop of color and freshness that pairs wonderfully with rich cheesecake flavors.
Using Food Coloring Wisely
When crafting Red Velvet Cheesecake Bites, food coloring plays an essential role in achieving that signature vibrant hue. However, it’s easy to go overboard; always start with a few drops and gradually add more until you achieve your desired color intensity. Keep in mind that natural red velvet recipes often rely on beet juice or other natural dyes instead of artificial colors for those looking for healthier alternatives while still showcasing stunning visuals.
Suggestions for RED VELVET CHEESECAKE BITES
Here are some creative suggestions that will elevate your Red Velvet Cheesecake Bites experience.
Pairing Flavors
Red Velvet Cheesecake Bites are versatile when it comes to pairing flavors! Consider enjoying them alongside complementary beverages like coffee or tea; their richness pairs well with dark roasts or herbal varieties alike. Additionally, hosting a dessert table? Include other desserts with similar flavor profiles such as chocolate mousse cups or even mini carrot cakes for delightful variety!
Serving Options
When serving Red Velvet Cheesecake Bites at gatherings or parties, think beyond traditional platters! Utilize decorative cupcake liners for individual servings; they add flair while keeping each bite intact during transport and serving! Alternatively, arrange them on tiered stands for an eye-catching display that invites guests to indulge in these delicious treats!
Storing Leftovers Properly
Leftover Red Velvet Cheesecake Bites should be stored correctly so they retain their delectable taste! Place them in an airtight container lined with parchment paper between layers (to prevent sticking) before refrigerating them immediately after cooling completely from baking! Consume within three days maximum; however freezing is also an option if you want longer-lasting delights—just remember: wrap tightly!
Customizing Recipes
Feel free to customize your Red Velvet Cheesecake Bites recipe according to personal preferences! For instance: try substituting part of the cream cheese with mascarpone cheese for extra creaminess; experiment by mixing in chocolate chips or flavored extracts such as almond extract instead! The possibilities are endless when it comes down customizing these luscious treats!
FAQs :
How can I store my RED VELVET CHEESECAKE BITES?
To keep your RED VELVET CHEESECAKE BITES fresh, store them in an airtight container in the refrigerator. They typically last for about 5 to 7 days. If you want to extend their shelf life, consider freezing them. Place the cheesecake bites on a baking sheet in a single layer and freeze until solid. Then transfer them to a freezer-safe bag or container. When you’re ready to enjoy them, simply thaw them in the refrigerator overnight. This method helps maintain their texture and flavor, ensuring that each bite remains delicious even after storage.
Can I make RED VELVET CHEESECAKE BITES ahead of time?
Absolutely! One of the best aspects of RED VELVET CHEESECAKE BITES is that they can be prepared ahead of time. You can make them up to two days before serving. Just remember to store them properly in an airtight container in the refrigerator. If you’re planning to serve these delightful treats at a party or gathering, preparing them in advance allows you more time to enjoy with your guests rather than being stuck in the kitchen.
What are some variations for RED VELVET CHEESECAKE BITES?
You can easily customize your RED VELVET CHEESECAKE BITES by adding different flavors or toppings. For instance, consider incorporating white chocolate chips into the cheesecake mixture for added sweetness and texture. You could also roll the bites in crushed nuts or sprinkles instead of cocoa powder for a colorful twist. Additionally, swapping out traditional cream cheese frosting for flavored varieties like peppermint or lemon can bring new dimensions to the flavor profile.
Are RED VELVET CHEESECAKE BITES suitable for gluten-free diets?
Yes, you can make gluten-free RED VELVET CHEESECAKE BITES by using gluten-free flour instead of regular all-purpose flour. Many gluten-free flour blends work well as substitutes and will maintain the texture and taste of your dessert. Be sure to check other ingredients like baking powder and any additional toppings you plan on using, as these may also contain gluten. With these adjustments, everyone can enjoy this delightful treat without worry.
What drinks pair well with RED VELVET CHEESECAKE BITES?
Pairing drinks with your RED VELVET CHEESECAKE BITES can enhance your dessert experience. A glass of chilled milk is a classic choice that complements the rich flavors perfectly. For something more sophisticated, try serving a dessert wine like Port or a sweet white wine which balances the sweetness of the cheesecake bites. Coffee lovers might enjoy pairing it with a strong espresso or flavored coffee that contrasts nicely with the creamy texture of the bites.
Can I use food coloring instead of cocoa powder for my RED VELVET CHEESECAKE BITES?
While cocoa powder is essential for giving traditional red velvet its signature flavor, you can use food coloring if you’re looking for vibrant colors without altering taste significantly. However, it’s recommended to use it alongside cocoa powder to achieve that classic red velvet flavor while ensuring your cheesecake bites have that stunning hue. Adjusting cocoa amounts and color intensity will help you find just the right balance.
Conclusion :
In summary, making RED VELVET CHEESECAKE BITES is an enjoyable process that results in delightful treats perfect for any occasion. From storing them properly in an airtight container to customizing flavors and textures, there are many ways to enhance this recipe’s versatility. You can prepare these cheesecake bites ahead of time, allowing you more time to relax during gatherings or celebrations.
These bite-sized desserts offer a blend of rich flavors and creamy textures that make them irresistibly delicious. Whether you’re hosting a party or simply indulging yourself, they are guaranteed crowd-pleasers. Don’t hesitate to experiment with various ingredients and toppings; this enhances not only their appearance but also their taste profile!
Ultimately, whether enjoyed with milk or paired with wine, your RED VELVET CHEESECAKE BITES will surely impress anyone who tries them!
Print
Irresistible Red Velvet Cheesecake Bites Recipe
- Total Time: 40 minutes
- Yield: About 16 bites
Description
Indulge in the decadent delight of Red Velvet Cheesecake Bites, a perfect harmony of rich red velvet cake and creamy cheesecake filling. These bite-sized treats are not only visually stunning but also incredibly easy to make. Ideal for parties, holiday gatherings, or just a sweet snack, they promise to impress your guests and satisfy your cravings. The luscious cream cheese center beautifully complements the soft, moist cake, creating an irresistible dessert that you won’t be able to resist. Ready to delight your taste buds? Let’s get started!
Ingredients
– 1 ½ cups all-purpose flour
– 2 tablespoons cocoa powder
– 1 cup granulated sugar
– 1 teaspoon baking soda
– ½ teaspoon salt
– ⅓ cup vegetable oil
– ½ cup buttermilk
– 1 large egg (room temperature)
– 1 teaspoon vanilla extract
– 8-ounce package cream cheese (softened)
– 1 cup powdered sugar
Instructions
1. Preheat your oven to 350°F (175°C) and prepare an 8×8-inch baking pan with parchment paper.
2. In one bowl, mix flour, cocoa powder, baking soda, and salt. In another bowl, blend vegetable oil, sugar, buttermilk, egg, and vanilla until smooth.
3. Combine wet and dry ingredients without overmixing. Pour into the prepared pan and bake for about 25 minutes or until a toothpick comes out clean.
4. For the filling, beat cream cheese with powdered sugar until creamy. Once the cake has cooled, slice it in half horizontally and spread the filling between layers.
5. Chill for at least 30 minutes before cutting into squares and serving.
Notes
– Customize by adding chocolate chips to the batter or using flavored extracts in the filling.
– For a gluten-free version, substitute all-purpose flour with a gluten-free blend.
- Prep Time: 15 minutes
- Cook Time: 25 minutes
Nutrition
- Fat: 7g
- Carbohydrates: 20g
- Protein: 2g