Introduction
Have you ever craved a dessert that envelops your senses in pure bliss? Picture this: a rich, dark chocolate cake layered with velvety frosting that melts in your mouth. The aroma wafts through your kitchen, hinting at the delight to come. This is not just any cake; this is Blackout Cake—a treat that promises an unforgettable experience with each bite.

When it comes to celebrations or simply satisfying a sweet tooth, nothing beats the allure of a perfectly baked blackout cake. With its deep cocoa flavor and moist texture, it becomes the centerpiece of any gathering. Whether it’s a birthday party or a cozy family dinner, this cake will steal the show and leave everyone asking for seconds.
Why You’ll Love This Blackout Cake
Indulgent Flavor Experience: This blackout cake boasts layers of intense chocolate flavor that satisfy even the most discerning sweet tooth. Each bite reveals a combination of rich cocoa and creamy frosting that creates an indulgent experience.
Perfect for Any Occasion: Whether you’re celebrating a birthday or hosting a dinner party, this cake is versatile enough to fit any gathering. Its stunning appearance and delicious taste make it an instant favorite.
Easy to Make: Despite its impressive look and taste, making blackout cake is straightforward. With simple ingredients and clear steps, you can create a bakery-quality dessert right at home without feeling overwhelmed.
Customizable Variations: The blackout cake recipe allows for numerous variations. Add spices like cinnamon for warmth or mix in coffee for added depth—feel free to get creative based on your preferences!
Ingredients
Here’s what you’ll need to make this delicious dish:
- All-Purpose Flour: Use unbleached all-purpose flour for the best texture; it helps achieve that perfect crumb.
- Cocoa Powder: Choose high-quality unsweetened cocoa powder to intensify the chocolate flavor.
- Granulated Sugar: Regular granulated sugar will sweeten the batter; adjust according to your taste.
- Baking Powder: Fresh baking powder is essential for leavening; ensure it’s not expired.
- Baking Soda: This adds extra lift and balances the acidity of other ingredients.
For the Frosting:
- Unsalted Butter: Use softened butter for smooth frosting; it should be at room temperature.
- Powdered Sugar: This gives the frosting its sweetness and fluffy texture; sift it before use for best results.
- Cream Cheese: Adds richness and tanginess to the frosting; ensure it’s softened before mixing.
The full ingredients list, including measurements, is provided in the recipe card directly below.
How to Make Blackout Cake
Follow these simple steps to prepare this delicious dish:
Preheat Your Oven: Start by preheating your oven to 350°F (175°C). Grease and flour two round cake pans to prevent sticking.
Mix Dry Ingredients: In a large bowl, whisk together flour, cocoa powder, sugar, baking powder, baking soda, and salt until well combined.
Add Wet Ingredients: Pour in eggs, milk, vegetable oil, and vanilla extract into the dry mixture. Beat on medium speed until smooth—about two minutes.
Bake the Cakes: Divide the batter evenly between prepared pans. Bake for about 30-35 minutes or until a toothpick inserted in the center comes out clean.
Prepare Frosting While Cooling: As cakes cool on wire racks, prepare your frosting by beating together softened butter and cream cheese until creamy. Gradually add powdered sugar until smooth.
Assemble Your Cake: Once cooled completely, place one layer on a serving plate. Spread frosting generously over it before adding the second layer on top. Frost the top and sides as desired.
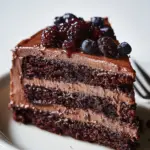
Transfer to plates and serve with fresh berries or whipped cream for an elegant touch.

Tips and Tricks
Here are some helpful tips to ensure the best results for your dish:
Use Quality Ingredients: Invest in high-quality chocolate products as they greatly enhance flavor—this is especially true for cocoa powder.
Measure Accurately: Accurate measurements are crucial in baking; consider using weight measurements when possible for consistency.
Don’t Overmix Batter: Mix just until combined after adding wet ingredients; overmixing can lead to dense cakes instead of light ones.
Cool Completely Before Frosting: Ensure cakes are completely cooled before frosting them—this prevents melting and sliding of icing.
Add Texture with Toppings: Enhance your blackout cake by adding crushed nuts or sprinkles on top—this provides an appealing visual element along with added crunch!
Enjoy creating this delectable blackout cake that’s sure to impress!
Mistakes to avoid
Overbaking the Cake
One common mistake when making Blackout Cake is overbaking the layers. Overbaking can lead to a dry texture, which detracts from the cake’s overall appeal. To avoid this, monitor your cake closely during the last few minutes of baking. Use a toothpick or cake tester; it should come out clean or with a few moist crumbs attached. Typically, Blackout Cake layers bake at 350°F for about 25-30 minutes. Removing them promptly when they are just done will help maintain that rich, moist consistency.
Using Cold Ingredients
Another mistake is using cold ingredients straight from the fridge. For an even batter and optimal rise, ensure your butter, eggs, and any other dairy ingredients are at room temperature before mixing. This usually means taking them out of the refrigerator about 30 minutes prior to starting your recipe. Cold ingredients can create lumps in your batter and negatively affect the cake’s texture, resulting in a less-than-perfect Blackout Cake that lacks the desired fluffiness.
Not Sifting Dry Ingredients
Failing to sift dry ingredients like flour and cocoa powder can lead to clumps in your batter. These lumps can affect both the texture and taste of your Blackout Cake. Sifting helps aerate these ingredients, ensuring they mix smoothly with wet components. Invest a few extra minutes to sift before combining everything; it will make a big difference in how well your batter comes together. Aim for a fine, lump-free mixture to set up your cake for success.
Serving Suggestions
This Blackout Cake is versatile and pairs wonderfully with a variety of accompaniments. For a delightful experience, serve it with a scoop of vanilla ice cream. The cool creaminess of the ice cream perfectly balances the rich, chocolatey flavors of the cake. You can also drizzle some chocolate sauce over the top for an extra indulgent treat. This combination makes for a classic dessert that is sure to impress your guests.
Another excellent serving suggestion is to pair your Blackout Cake with fresh berries. Raspberries or strawberries add a refreshing contrast to the dense cake, enhancing both flavor and presentation. The tartness of the berries cuts through the sweetness, creating a well-rounded dessert that looks beautiful on any plate.
For those who enjoy a touch of sophistication, consider serving the Blackout Cake alongside a cup of strong coffee or espresso. The bold flavors of coffee complement the chocolate beautifully, making this pairing perfect for an after-dinner treat. A sprinkle of powdered sugar on top adds elegance and flair to your presentation.
Lastly, if you want to elevate your cake experience further, try adding whipped cream as a topping. Light and fluffy whipped cream contrasts nicely with the dense chocolate layers of the Blackout Cake. It’s particularly delicious if you flavor your whipped cream with a hint of vanilla or even orange zest for an unexpected twist.

FAQs
What is Blackout Cake?
Blackout Cake is a rich and decadent chocolate cake known for its deep flavor and moist texture. It typically consists of multiple layers of chocolate cake filled with chocolate pudding or frosting and is often topped with more chocolate frosting or ganache. This indulgent dessert originated in Brooklyn, New York, and remains popular among chocolate lovers.
How should I store leftover Blackout Cake?
To keep your leftover Blackout Cake fresh, store it in an airtight container at room temperature if you plan to eat it within two days. For longer storage, refrigerate it in the container for up to one week. You can also freeze slices wrapped tightly in plastic wrap followed by aluminum foil for up to three months.
Can I use different types of flour for Blackout Cake?
While all-purpose flour is usually recommended for making Blackout Cake, you can experiment with alternatives like whole wheat flour or gluten-free flour blends. Keep in mind that using different flours may alter the texture slightly; therefore, it’s best to follow specific recipes designed for those flour types when baking.
What occasions are best suited for serving Blackout Cake?
Blackout Cake is perfect for various occasions such as birthdays, anniversaries, or dinner parties where chocolate lovers gather. Its rich taste makes it an ideal dessert during holidays like Christmas or Valentine’s Day as well. No matter the celebration, this cake will surely impress your guests with its decadent flavor.
Conclusion
In summary, Blackout Cake stands out as a deliciously rich dessert that will satisfy any chocoholic’s cravings. With its multiple layers and luscious fillings, it’s perfect for special occasions or casual gatherings alike. Pairing it with ice cream, fresh berries, coffee, or whipped cream enhances its appeal while offering diverse tasting experiences. Storing leftovers properly ensures that you can enjoy this decadent treat even longer. Whether you’re celebrating a birthday or simply enjoying a sweet moment at home, Blackout Cake remains a fabulous choice that never disappoints.
Blackout Cake
- Total Time: 55 minutes
- Yield: Serves approximately 12 slices 1x
Description
Indulge in the rich and decadent Blackout Cake, featuring layers of moist chocolate cake wrapped in luscious chocolate frosting. Perfect for any celebration, this dessert is sure to impress with its deep flavor and stunning presentation. Each slice promises a delightful experience that will leave chocolate lovers craving more.
Ingredients
- 2 cups all-purpose flour
- 3/4 cup unsweetened cocoa powder
- 2 cups granulated sugar
- 1 1/2 teaspoons baking powder
- 1 1/2 teaspoons baking soda
- 1 teaspoon salt
- 3 large eggs
- 1 cup milk
- 1/2 cup vegetable oil
- 2 teaspoons vanilla extract
- 1 cup unsalted butter (softened)
- 8 oz cream cheese (softened)
- 4 cups powdered sugar
Instructions
- Preheat the oven to 350°F (175°C) and grease two round cake pans.
- In a large bowl, mix flour, cocoa powder, sugar, baking powder, baking soda, and salt.
- Add eggs, milk, oil, and vanilla; beat on medium speed for about two minutes until smooth.
- Divide batter between prepared pans and bake for 30-35 minutes or until a toothpick comes out clean.
- Allow cakes to cool completely on wire racks before frosting with a mixture of butter, cream cheese, and powdered sugar.
- Prep Time: 20 minutes
- Cook Time: 35 minutes
- Category: Dessert
- Method: Baking
- Cuisine: American
Nutrition
- Serving Size: 1 serving
- Calories: 350
- Sugar: 28g
- Sodium: 250mg
- Fat: 17g
- Saturated Fat: 7g
- Unsaturated Fat: 9g
- Trans Fat: <0.5g
- Carbohydrates: 46g
- Fiber: 3g
- Protein: 5g
- Cholesterol: 40mg
Keywords: Use room temperature ingredients for better mixing. Sift dry ingredients to avoid lumps. Customize by adding coffee or spices for extra flavor depth.